Azure
Storage Account
A Storage
Account in Azure is a logical (Virtual)
division of the storage hardware at Azure Datacenters, where we are
provided with the explicit access to that particular account and
storage via different medium such as (Azure Portal or Storage
Explorer or any other tool) to store our data which are secured with
different layers of security.
Microsoft allow to
create a storage account at the subscription level in a resource
group. Later we can link this storage account with a Virtual Network
and its subnet if we want it to be used by internal users only.
Further, under
storage account we can use different types of storages as per our
need. There are four type of storage under each storage account:
- Blob Storage
- File Storage / File Share
- Table Storage
- Queue Storage
Blob
Storage
Blob
is a type of storage where you can upload any type of file or folder
with any extension. There are multiple ways to access blob storage
but the most popular are – either to access the blob storage using
Azure Portal or ‘Azure Storage Explorer’.
Azure Storage
Explorer: It is a Microsoft tool which
is specially developed to access different storage account in Azure
from your local machine or as per need. To download this tool just go
to google and type –‘Azure Storage Explorer download’ you will
get the first link to the page to download the tool.
The objects created
/ uploaded in the blob storage could be used to upload or load in
different resources in Azure or even to your web based solution. Each
object is associated with a link (URL), which can be seen in
properties of that object. Capacity of Blob storage is Up to 2 PiB
Account and object size limit is up to about 4.75 TiB per block blob.
It’s costing is based on bytes written in the Blob. Disks are also
type of blob storage and its maximum allowed size is 4 TiB disk.
File
Storage
File Storage is
specifically used as to provide the cloud based storage solution to
your environment shared objects or files. This storage type works as
a Network drive in your machine and could be attached by using a
Power-shell script provided once the file share is created in storage
account (Click on Connect option in your File to get the PS script to
connect locally).
** Conditional
Access: You will be able to configure this shared Network Drive to
your local machine, only if Port # 445
is open to your network and machine.
File share communicates with your local machine as a Network drive
using this port.
If you are looking
to set up a network drive for a specific team in your organization
and you want your team to drop the shared files and object at one
place and can get easy access to it whenever needed, this could be
best solution for you on Azure. Capacity of a File Share is 5 TiB
file shares and object size up to 1 TiB per file. It’s costing is
based on file size.
Table
Storage
Relational data like
Tables could be uploaded in Table Storage type in Azure. This table
is callable or can be linked or uploaded to database in your Azure
environment when so ever needed.
You can create a
table in Azure portal but to add new column or to upload content that
is do-able by using Azure Storage Explorer on your local machine. You
can upload the Excel or CSV files by using the same tool in your
local machine.
Currently, till
April 2019, maximum size of a File Storage that can be created is 5
TB. I have specified the date because Microsoft continuously upgrades
their services so later it may increase.
Queue
Storage
Azure Queue storage
is a service for storing large numbers of messages that can be
accessed from anywhere in the world via authenticated calls using
HTTP or HTTPS. A single queue message can be up to 64 KB in size, and
a queue can contain millions of messages, up to the total capacity
limit of a storage account.
Common uses of Queue
storage include:
- Creating a backlog of work to process asynchronously.
- Passing messages from an Azure web role to an Azure worker role.
Creating
& using Azure Storage Account
Demo
1: Creating Azure Storage Account and Configuring Network Access:
Go to + Create
a resource > Storage
> Storage account
> Create a storage account.
Select the
subscription in which you want to create the storage account. Create
a new Resource Group or select an existing one for deploying the
storage account in it. Give a suitable name for the storage account
which will be acting as DNS. Select a location to deploy your
resource and choose Performance as standard. For Account Kind select
Storage (general purpose v2). Select the replication type that you
need and click on Next : Advanced > button to configure further
settings.

For virtual
networks, enable Select network option
and click on Create new
option to create a new virtual network.
This is for deploying the storage account up on a virtual network for
security and restrictions. This will make only the resources that run
on the created virtual network will be allowed to access the storage
account. To allow other resources to access the storage account,
firewall
must be configured.
Give a name to the
VNET and modify the address space range as per your need. Give a name
for the subnet and select its address range as well. Then click on
Ok.
By now, the virtual
network and subnet that you configured will be selected. Click on
Review + create button
to start creating the storage account.

If you like to add
any resource Tags, click on Next: Tags
> button and add tags.
In the review blade,
the storage account configurations will be validated. If there is any
error in configurations, you will be shown here. On a successful
validation, click in Create
button to start creating the storage account.

Once after the
deployment gets over, you will be getting a Success
message. Then, click on Go to resource option to view the storage
account that you have created.
Now, let us try to
add some data into our storage account. In the overview page of the
blob, click on Blobs
option to navigate into blob service of storage account.

Click on +
Container button to add container. A
container is nothing but a folder for maintaining the resources that
you upload. With the name that you give to your container, you will
be able to easily organize the resources and manage them. It is
something like you creating a folder named videos for maintain videos
in it and another folder named pictures for maintaining pictures in
it.
Give a suitable name
for your container and select Public
access level as Private (no anonymous
access).

Here, we are
selecting Private and hence we will not be able to access the blobs
without authentication key. After giving the configurations, click on
OK. Now, the container will get created.

As mentioned
earlier, you will not have access to the blobs since you have created
the storage account on a virtual network. To gain access to the
storage account, either you should access the storage account from
virtual network or must add your machine’s IP address in the
firewall of storage account.
To add the IP
address in the firewall rules, go to Firewalls and virtual networks
option in the left side menu of your storage account. There, enable
Add your client IP address option to whitelist your machine’s IP to
access azure storage account. Then, click on save button.

Now, navigate again
to the container that you created earlier. This tile you will be
allowed to access the container.
In the container’s
Overview
page, click on Upload
option to upload a blob into the container. Now, click on browse
button to select any file in your computer.

Select any file in
your machine to upload and then click on Open.
After choosing the
file, click on Advanced option to explore options available for
uploading a blob. The different blob types will be discussed in the
next demo.
In the advanced
option, give a name in Upload to folder option for uploading the blob
into a folder. Then, click in Upload button.

After the file gets
uploaded, you will get a success message and you can also see a new
folder got created in the container.
Click on it to
navigate into the folder to check the blob file.

You will now be able
to find the blob file that you uploaded earlier. Click on the file to
view its URL and properties.
Copy its URL and
browse for it to view the file that you uploaded.

When you ping the
URL of the blob file, you won’t get any response. There will be an
error message saying that the resource does not exist. This is
because of the reason that we created the container with Private
level of access. To access the blob, we need an authentication token
as explained earlier. It is called as Shared Access Signature.
Demo
2: Generating Shared Access Signature:
For generating a SAS
signature click on Generate SAS in the properties blade of blob that
you were previously in. You can choose the kind of permission which
you like to implement. SAS Signature can be generated on time basis.
You can give a start time and end time for the token. This will
ensure that the authentication token will get expired after the time
span gets over. After setting the time, click on Generate blob SAS
token and URL to get the SAS token.


After the signature
gets generated, copy the entire URL that is shown at the last as Blob
SAS URL to access the blob. In addition
to that, you can also copy the token alone that is shown above the
URL and append it with the URL of any other blob that is maintained
in your container.
Now, ping the Blob
SAS URL that you copied earlier. This time the blob will be shown.
Here, you can be able to view the file for next two minutes since the
SAS token that is generated is valid from till the given time only.
If you ping the URL after this time, there will be no response.

Again, if you ping
the URL after that time, there will be no access to your data.
You can generate the
SAS tokens for the entire storage account as well. To generate this,
you can go to the storage account and select Shared access signature
and click. There you can select the resources to which the token has
to be generated; the time frame and IP address ranges as well.
Finally, you can click on Generate SAS and Connection String to get
the SAS token.

Demo
3: Exploring Storage Account via Storage Explorer:
Azure Storage
Explorer is a standalone app that enables you to easily work with
Azure Storage data on Windows, macOS, and Linux.
Microsoft Azure has
integrated Storage Explorer which is in preview. This can be accessed
by navigating to Storage Explorer
(preview) option in the left side menu
of the storage account. There you have an option to navigate into the
storage account container and all other resources. There you can
choose the file that you like to access. You can access the resource
by clicking it and you can copy the URL of those resources by
clicking on Copy URL option in the top.

In addition to this,
you can install the Azure Storage
Explorer and use it to work with the
storage service. Navigate to
https://azure.microsoft.com/en-us/features/storage-explorer/
to download azure storage explorer setup and install the same.

After installing the
storage explorer, open it and click on Add an account option to login
to azure subscription.
Storage Explorer
provides several ways to connect to storage accounts. For example,
you can:
- Connect to storage accounts associated with your Azure subscriptions, using user ID and password to your Azure account.
- Connect to storage accounts using connection string for your Storage account in Azure.
- Connect to storage accounts using Shared Access Signature (SAS).
- Connect to storage accounts using storage Account name & a shared access key from your Azure subscriptions.

Select Add an Azure
Account and select environment as Azure and click on Sign
in. Enter login Details and you will be
able to explore all your storage account in the explorer (Reference
Image 1).
Or if you are trying
to login using account name and key (4th
option) you will get the page as (Reference Image 2) below to enter
Display name, Storage Account Name & Account Key (You can get
this from Azure portal > Storage Account > Access Keys >
Key1 (Copy)). Enter the details and click on Next
and then Connect.

I have shown only
two mode of authentication; please explore other two by your own.
- Ex. If you have used SAS tokens to give access to storage, go for SAS option to login.
You can now navigate
to the storage account that you have added (I have used my name
–‘Gaurav-Kariya’ as display name) and view the blob and the
containers inside it.

Select any one
container and Click on Upload option to choose any file that you like
to upload and click Upload.

You can now select
the uploaded file and click on copy URL to get the URL of the file.
You can use the storage explorer to manage the blobs, taking
snapshots and generating SAS as well.


Paste the URL in new tab in your
browser, you should be able to see the Image that we have uploaded.
Demo
4: Exploring and Regenerating Access Keys:
When you create a
storage account, Azure generates two 512-bit storage account access
keys. These keys can be used to authorize access to your storage
account via Shared Key. You can rotate and regenerate the keys
without interruption to your applications, and Microsoft recommends
that you do so regularly. Your storage account key is similar to the
root password for your storage account. Always be careful to protect
your account key. Avoid distributing it to other users, hard-coding
it, or saving it anywhere in plaintext that is accessible to others.
Regenerate your account key using the Azure portal if you believe it
may have been compromised.
To view your access
key, click on Access keys option in the left side menu of your
storage account. There you can view two keys that can be used for to
authenticate to storage account. The two storage keys are given for
the purpose of avoiding the downtime of resources while regenerating
an access key. To regenerate key, click on the regeneration key that
we have. After successfully regenerating the key, check the key that
you had earlier. You will be able to view a change in the key.

Demo
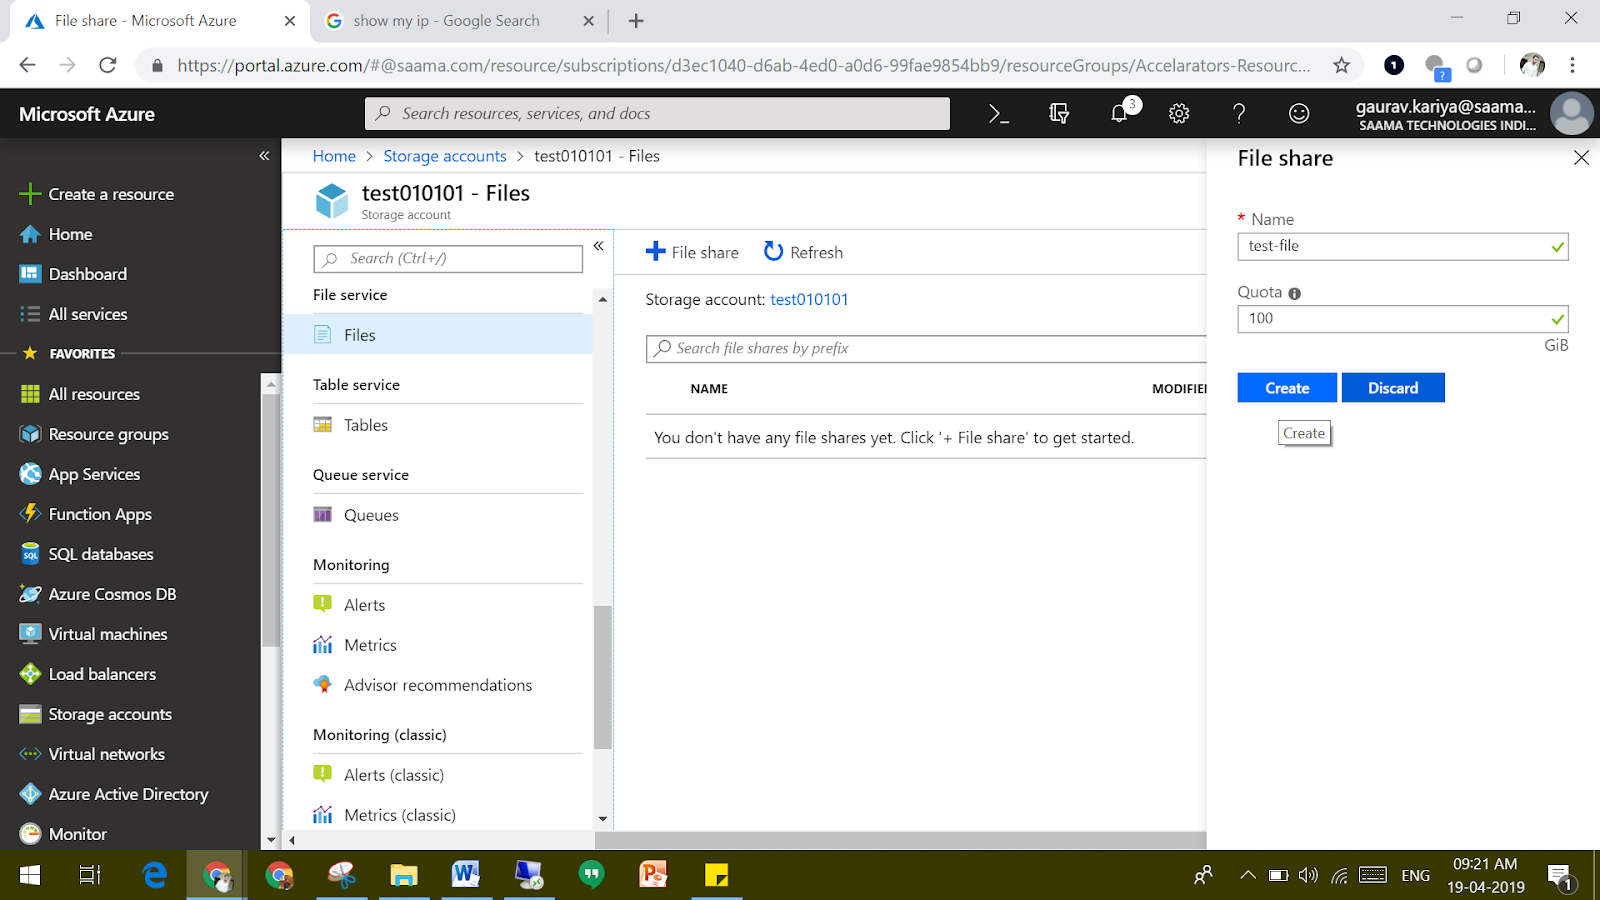
5: Adding File Share:
Go to the Storage
Account’s overview page and click on Files option.
Now, click on ‘+
File Share’ option to add a file share. Give a name, some size that
matches to the size of files that you will be syncing and click on
OK. You can now upload your files into the File Share and maintain
their access in your organization.
You can add your
file share as a Network drive in your machines.
First you need to
enable (allow) port 445 in your network where you want to add the
drive, you can check that by using command – >netstat -a

Then by clicking on
‘Connect’ option when you enter into your File Share that you
have created. Then Copy the Powershell Script that you see in the
right blade & paste it to the powershell windows of your end
machine where you want that network drive to be connected.

You will see the
success message as the command execution is completed. Once this is
done you can see the Network drive connected in your end machine.

*Note: Sometimes
when Network Discovery is off in your machine you will not be able to
see the Network Drive Connected in your machine, for that please
enable Network Discovery in Network and Sharing Center > Advanced
Sharing Settings.

Then re-run the
powershell script, you will get below screen:

Now, whatever
objects you upload or copy paste here in this drive, it will be
immediately available in the Azure Portal File-Share.

Demo
6: Adding Table:
Table could also be
uploaded same way we did for blob storage to upload image.
(The only difference
is you can upload Excel or CSV file only in case of Tables)
Demo
7: Adding Queues:
You can add messages
for calling in when required (used in web development).
For Azure Cloud computing Classes, click here
For AWS Cloud Computing training, Click Here
Below are the awesome books you must have.
Comments
Post a Comment