Important Terms


Thank you for Visiting our blog.
For Azure, AWS and Google cloud training classes, click here
Below are Some awesome books related to cloud you must have in your bag.
- Virtual Network (VNET)
An Azure Virtual Network
(VNet) is a representation of your own network in the cloud. It is a
logical isolation of the Azure cloud dedicated to your subscription.
- Subnet
A subnetwork or subnet is
a logical subdivision of an IP network. The practice of dividing a
network into two or more networks is called subnetting. Computers
that belong to a subnet are addressed with an identical
most-significant bit-group in their IP addresses.
- Private IP Address
A private IP address is a
non-Internet facing IP address on an internal network. Private IP
addresses are provided by network devices, such as routers, using
network address translation (NAT).
- Public IP Address
A public IP address is an
IP address that can be accessed over the Internet. Like postal
address used to deliver a postal mail to your home, a public IP
address is the globally unique IP address assigned to a computing
device. Your public IP address can be found at ‘show my IP Address’
search on google.
- Network Security Group (NSG)
A network security group
(NSG) is a networking filter (firewall) containing a list of security
rules allowing or denying network traffic to resources connected to
Azure VNets. These rules can manage both inbound and outbound
traffic.
Implementing
and Managing Azure Network
Demo 1: Designing VNET and subnet
Step 1: In the Portal, Go
to: + New > Networking > Click on
Virtual Network:

Step 2: In the Virtual
Network blade, fill the details as shown below and Click Create:

Step 3: Once deployed, an
overview window of your VNet will be displayed. There click on the
subnets option at the
left side:

Step 4: Once you click on
the + Subnet,
configure the subnet as shown below:

Step 5: Once you click on
the + Subnet,
configure the subnet as shown below:

Step 6: You can now find
the two subnets.

Demo 2: Configure Static and Dynamic Public IP Addresses
Step 1: In the Portal, go
to: + Create a resource - > Search for
Public IP Address > Click on Create:

Step 2: Once you click
Create, configure the Public IP address as shown below on the blade:

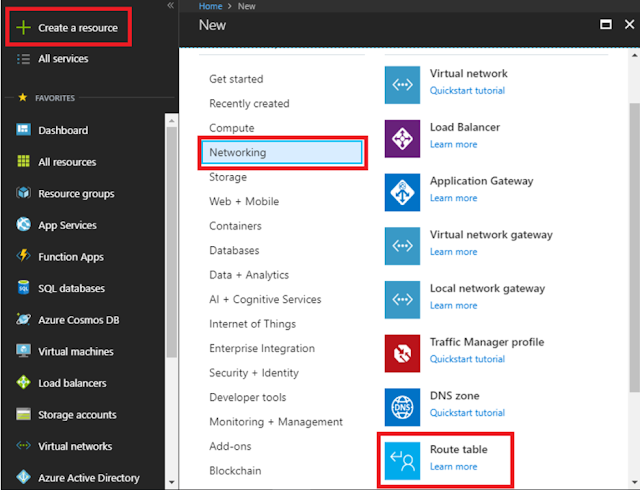
Demo 3: Design User-Defined Routes (UDRs)
Step 1: In the Portal, go
to: + New > Networking > Route Table:

Step 2: In the New Route
Table blade, fill the Subscription, Resource Group and Location
details:

Step 3: In the Route Table
window, Select Subnets just like you did for NSG
> Select the desired
Subnet > Click OK:


Step 4: In the Route Table
window, Select the Routes option in the menu >
Click on + Add >
Configure > Click
OK:

Demo 4: Setting up Network Security Groups (NSGs)
Step 1: In the Portal, go
to: +New > Networking > Click on Networking Security Group

Step 2: Once you click on
NSG, add the NSG to a Resource Group as shown below and click Create:

Step 3: In the NSG window,
Select Subnets in the menu > Click on +Associate to select a
subnet:

Step 4: In the +Associate
blade, Select Virtual Network in which the Subnet is present >
Click on desired Subnet > OK:


Step 5: Once you associate
the Subnet, click on the Inbound Rules in the menu to configure them.
To create an Inbound Security rule specifically for the HTTP traffic,
click on +Add in Inbound Security rules blade:

Step 7: Once you click
+Add, configure the rule as shown below:

Thank you for Visiting our blog.
For Azure, AWS and Google cloud training classes, click here
Below are Some awesome books related to cloud you must have in your bag.
Comments
Post a Comment